Growing peppers from seed requires patience and proper timing, but the reward of harvesting homegrown peppers makes the effort worthwhile. Starting seeds indoors during late winter or early spring gives these heat-loving plants the head start they need to produce abundant fruit by summer. With the right approach, pepper seedlings started now will be strong, healthy plants ready for outdoor transplantation when warm weather arrives in June.
Why start your pepper seeds indoors
Extended growing season benefits
Peppers require a long growing season to reach maturity, typically between 60 to 90 days from transplantation. Starting seeds indoors adds several crucial weeks to this timeline, allowing gardeners in cooler climates to successfully grow varieties that would otherwise struggle to produce fruit before the first frost. This method effectively extends the productive period of pepper plants by giving them a substantial head start.
Protection from unpredictable weather
Young pepper seedlings are extremely vulnerable to temperature fluctuations, frost, and excessive moisture. Indoor starting provides a controlled environment where conditions can be optimized for germination and early growth. This protection ensures higher survival rates compared to direct sowing outdoors, where late spring cold snaps or heavy rains can devastate emerging seedlings.
Better control over growing conditions
Indoor seed starting allows precise management of critical factors including:
- Soil temperature maintained between 75-85°F for optimal germination
- Consistent moisture levels without waterlogging
- Adequate light exposure through grow lights or sunny windowsills
- Protection from pests and diseases common in outdoor environments
Understanding these advantages sets the foundation for selecting which pepper varieties will thrive under your indoor starting regimen.
The best pepper seed varieties for indoor planting
Sweet pepper selections
For gardeners seeking mild, versatile peppers, several varieties excel when started indoors. Bell peppers remain the most popular choice, with California Wonder and Big Bertha producing large, blocky fruits. Sweet banana peppers and Italian sweet peppers also perform exceptionally well, offering earlier maturation times that suit shorter growing seasons.
Hot pepper options
Heat enthusiasts have numerous options for indoor seed starting. Jalapeños, with their moderate heat level and reliable production, represent an excellent starting point. Cayenne peppers grow vigorously and produce abundantly, while habaneros and ghost peppers appeal to those seeking extreme heat levels, though these require longer growing periods.
Specialty and heirloom varieties
| Variety | Days to Maturity | Heat Level | Best Use |
|---|---|---|---|
| Shishito | 60-65 days | Mild | Grilling, stir-fry |
| Poblano | 65-75 days | Mild-Medium | Stuffing, roasting |
| Serrano | 70-80 days | Hot | Salsas, sauces |
| Thai Chili | 75-85 days | Very Hot | Asian cuisine |
Once you’ve selected your preferred varieties, gathering the proper equipment becomes the next essential step.
Preparing the necessary equipment for planting
Seed starting containers
Successful indoor pepper growing begins with appropriate containers. Seed starting trays with individual cells work exceptionally well, typically measuring 2-3 inches deep. Biodegradable peat pots offer the advantage of direct transplantation without root disturbance. Recycled containers like yogurt cups or egg cartons can serve as budget-friendly alternatives, provided they have adequate drainage holes.
Growing medium selection
Regular garden soil proves too dense for seed starting. Instead, use a sterile seed-starting mix composed of peat moss, vermiculite, and perlite. This lightweight combination provides excellent drainage while retaining sufficient moisture. Some gardeners prefer coconut coir-based mixes as a sustainable alternative to peat-based products.
Lighting and heating requirements
Pepper seeds germinate best with bottom heat and adequate light once sprouted. Essential equipment includes:
- Seedling heat mats maintaining soil temperature at 75-85°F
- Full-spectrum grow lights positioned 2-3 inches above seedlings
- Timer for lights to provide 14-16 hours of daily illumination
- Humidity dome or plastic wrap to retain moisture during germination
- Small fan for air circulation once seedlings emerge
With equipment assembled, you’re ready to begin the actual planting process.
Steps to successfully seed pepper seeds indoors
Container and soil preparation
Fill your chosen containers with pre-moistened seed starting mix, leaving approximately half an inch of space below the rim. Gently firm the soil to eliminate large air pockets while maintaining a loose, airy texture. Pre-moistening prevents seeds from washing away during initial watering and ensures immediate moisture availability for germination.
Proper seed planting depth and spacing
Plant pepper seeds at a depth of quarter-inch, roughly twice the seed’s diameter. Place 2-3 seeds per cell or container to ensure at least one successful germination. Cover seeds lightly with additional seed starting mix and gently press down to establish good seed-to-soil contact.
Creating optimal germination conditions
After planting, mist the soil surface with water and cover containers with a humidity dome or clear plastic wrap. Place containers on a seedling heat mat set to 80°F. Position the setup in a warm location, though direct light isn’t necessary until germination occurs. Check daily for moisture, misting as needed to keep soil consistently damp but not waterlogged.
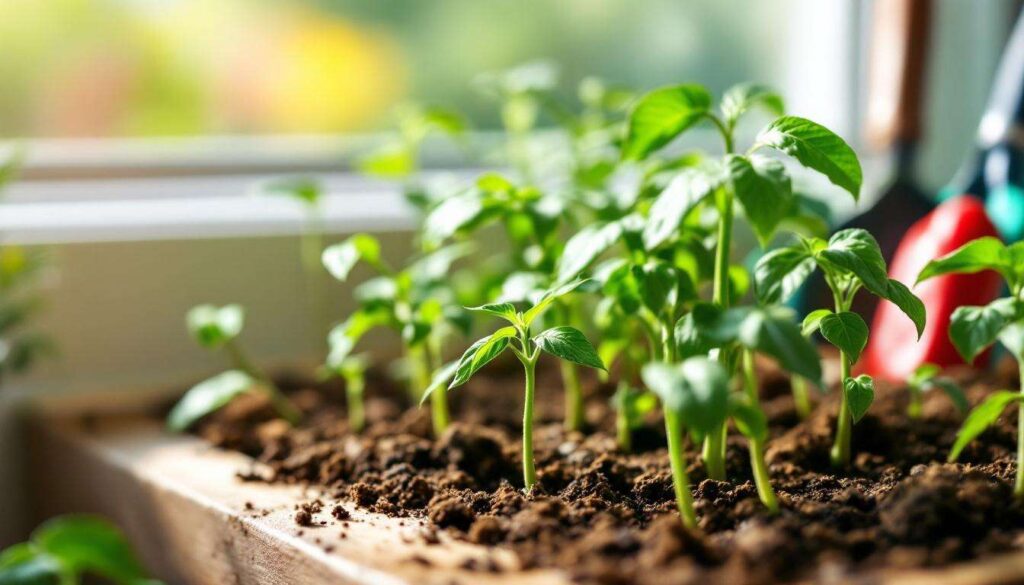
Post-germination care
Pepper seeds typically germinate within 7-14 days, though some varieties may take up to three weeks. Once seedlings emerge, immediately remove humidity covers and move containers under grow lights. Reduce soil temperature to 70-75°F. When seedlings develop their first true leaves (the second set of leaves), thin to one strong plant per container by snipping weaker seedlings at soil level.
As your seedlings establish themselves, ongoing care becomes crucial for developing robust plants.
Tips for caring for pepper plants until transplantation
Watering practices for healthy growth
Consistent moisture without oversaturation represents the golden rule for pepper seedling care. Water when the top quarter-inch of soil feels dry to the touch, typically every 2-3 days. Always water at the soil level rather than overhead to prevent fungal diseases. Ensure containers drain completely, as standing water causes root rot and damping-off disease.
Fertilization schedule
Begin feeding seedlings once they develop their first true leaves. Use a diluted liquid fertilizer at quarter-strength every two weeks. Fish emulsion or balanced water-soluble fertilizers with equal NPK ratios work well. Increase to half-strength as plants grow larger and develop more leaves.
Light management and positioning
Maintain grow lights 2-3 inches above the tops of seedlings, adjusting height as plants grow. Provide 14-16 hours of light daily using a timer for consistency. Rotate containers every few days to ensure even growth and prevent leaning toward the light source.
Hardening off process
Two weeks before transplantation, begin acclimating seedlings to outdoor conditions through hardening off:
- Day 1-2: Place plants outdoors in shade for 1-2 hours
- Day 3-4: Increase outdoor time to 3-4 hours, still in shade
- Day 5-7: Introduce morning sun for 1-2 hours, extending gradually
- Day 8-10: Expose to full sun for increasing periods
- Day 11-14: Leave outdoors all day, bringing in only if frost threatens
This gradual exposure prepares plants for the environmental shock of permanent outdoor placement.
Ideal timing and tips for outdoor transplantation
Determining the right transplant date
Peppers are extremely frost-sensitive and require warm soil for successful establishment. Transplant only after all danger of frost has passed and soil temperatures consistently remain above 60°F, preferably 65-70°F. For most regions targeting June harvests, this means transplanting in late April through mid-May, depending on your specific climate zone.
Site selection and soil preparation
Choose a location receiving full sun (minimum 6-8 hours daily) with well-draining soil. Amend planting areas with compost or aged manure two weeks before transplantation. Test soil pH, aiming for 6.0-6.8, and adjust if necessary. Create raised beds or mounds in areas with heavy clay soil to improve drainage.
Transplantation technique
Transplant on a cloudy day or in late afternoon to minimize transplant shock. Dig holes slightly larger than root balls, spacing plants 18-24 inches apart in rows 24-36 inches apart. Set plants at the same depth they grew in containers. Water thoroughly after planting and apply a layer of mulch around plants to retain moisture and regulate soil temperature.
Post-transplant care
Monitor transplanted peppers closely for the first two weeks. Water deeply when the top inch of soil dries out. Protect plants from unexpected cold snaps with row covers or cloches. Avoid fertilizing immediately after transplanting; wait 2-3 weeks until plants show new growth, indicating successful root establishment.
Starting pepper seeds indoors provides gardeners with healthy, vigorous plants ready for June production. This method overcomes the challenges of short growing seasons and unpredictable spring weather while offering control over variety selection and plant quality. By following proper seed starting techniques, maintaining optimal growing conditions, and timing transplantation correctly, you’ll enjoy abundant pepper harvests throughout the summer months. The investment of time and attention during these early growth stages pays dividends in plant health, productivity, and the satisfaction of growing peppers from seed to harvest.